Tin Roof Begins!
Well after completing the jig for my copper pressing, I let it sit all night with a weight of rocks on top. And then it was off to the races. The jig sat good, but it was challenging to keep all the ribs straight. The 3/4 thickness of the jig was needed to determine the gap and bend in the ribs. Keeping a sharp edge when it went around the edge of the jig was always challenging, even with a good clean edge on the jig.


I had found the small wooden spatula at a home decor shop several years ago, and I use it when I need to crease paper, and the tool was invaluable for this project. The flat edge helped to keep the copper flat, and the handle ended up being the exact width between the ribs. That was divine design and not calculated by me. The spatula keep getting nicked by the sharp edges of the copper (and so did I, now that I look at my hands). I had to use a sanding stick to keep sanding the nicks out of the spatula so that it wouldn't put grooves in the copper.

The copper is thicker than tin foil, but not as thick as the aluminum from a tin can. I thought I had saved the email receipt from the purchase to tell you the exact thickness, but unfortunately the purchase was about two years ago and there is nothing on the packaging that I can tell to let you know. If I had it to do again, I would have gotten something slightly thicker. But I guess in order to bend easily this was the required thickness. The plans in Miniature Collector just said copper foil, with no thickness specified, just had St Louis Crafts, which I am not familiar with at all.
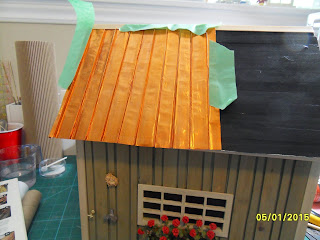
Looks good close up right?

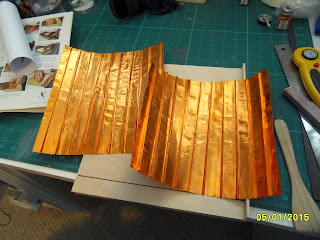
After the first piece was ribbed, I tested it on the shed. Unfortunately I could not find a complete sheet that would do the entire roof, so I have to hide a seam in the rib.

I purchased 6 packs, two for each side, and one for the top edge and one for any mistakes I would make! So once I had two completely ribbed, it was out with the Liquid Nail (as per the instructions in Miniature Collector). I used a hotel room card to evenly spread the Liquid Nail across the roof. ( I have about 100 hotel room cards if anyone is looking, two many nights in a hotel for me).

And then came the most difficult part. I had sticky fingers! It was extremely difficult to hide the seam in a rib next time I will not do it that way. Just let it slide under a rib would have been better, but the rib was made and I had to use it. I have used a stick of wood and some clamps to hold the seam and the end down to dry. The first edge stuck completely with no issues or clamps required. Overall the Liquid Nail was fantastic.

It looks bright and shiny and in need of some weathering. There is a little bit of a black edge showing at the top, but the overlap ridge cap and a little bit of moss will cover that in the end!
I am pleased so far, I'll give you an update tomorrow, once everything is dried and hopefully well adhered!
Thanks for all your kind comments on the work so far. I have several other postings written that I will post in the coming weeks. Waiting for little bits to add to things before I can post them.
Until the next time......
Wanda


Hi Wanda, The roof looks just as it should! I bet you feel very happy! Take care.
ReplyDeleteJanine
Te ha quedado genial ese tejado!!!
ReplyDeleteBesos.
I love the idea of using actual copper sheet for the roof. Looking forward to seeing how you weather it =0)
ReplyDeleteNice! :D I love shiny copper in general, but yes, it will need weathering for your project. Love it so far!
ReplyDelete