Day Three at Camp Mini Ha Ha
Another great day at Camp today. I started to cut my windows in the tower, and made a mistake by cutting them the exact size as the wood window. Once I sanded the opening after cutting, I quickly realized the holes where two small. Since there was an inner wall on this side (to hold up the ceiling), I was lucky and cut the inner wall smaller and the wood windows can lie back on this panel. I decided to wait for another day before attempting to cut the remaining windows!
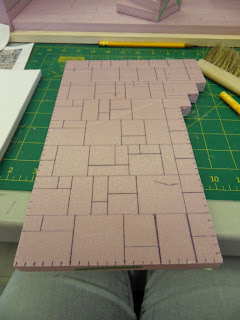
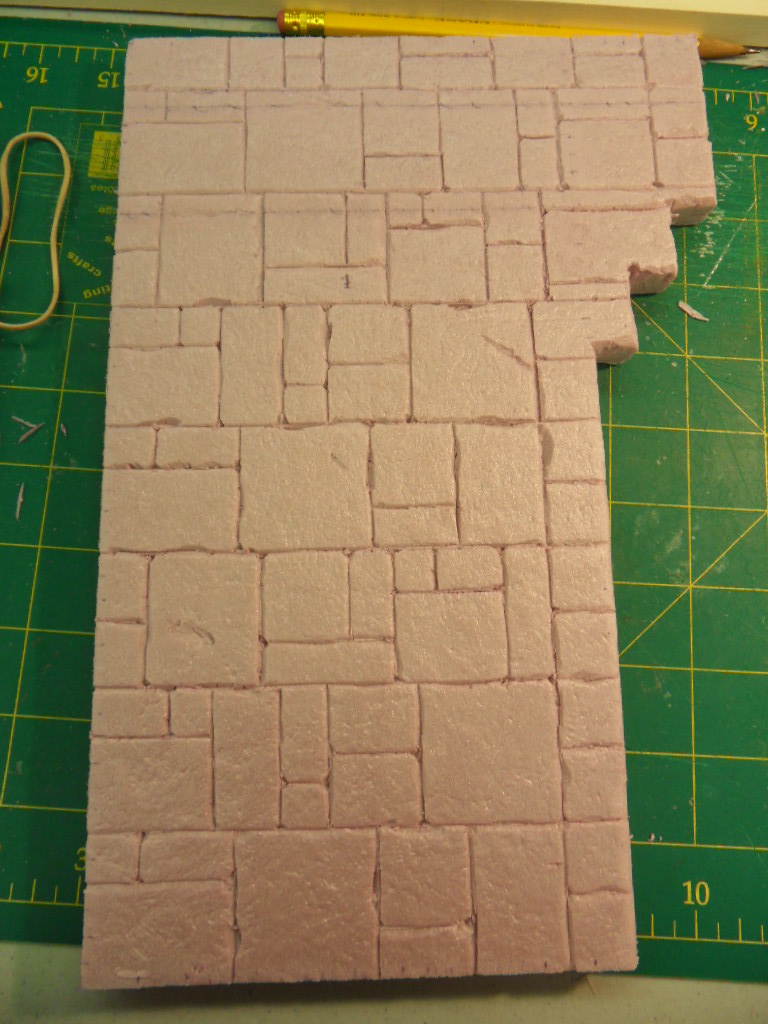
I decided to move on to carving the stone. At this point I made a big decision. Instead of having a stone floor, which most medieval castles had (if not mud), I decided to have a rough hewn wood floor. I was told that only the upper floors were made from wood, so we will all have to pretend there’s another level under this floor that we can’t see right now.
I drew my pattern unto the foam with a pen first, then scored it with my sharp Olfa knife, and then using a wire brush, I dragged it through the planks to give it the rough hewn effect. I hope you can see the difference in the “planks” before and after I added the grain. I still want to add nailheads, but we are tossing around a few ideas on how to do this effectively. It’s a job for another day.
Then I moved on to carving my first stone wall. Again I laid out a pattern on graph paper first, then drew it on the wall using a ball point pen, and again I made a mistake, but once it’s painted you won’t see the two lines that are drawn in the wrong spots!!
I carved out the stones with the same knife, and it looked too perfectly straight, which wouldn’t be the look of an old castle, so then I proceeded into chipping away bits of the stone to give it a more authentic look. We also textured the walls using a rolled up piece of tin foil. It leaves an extremely authentic look to the “stone.”
I don’t seem to have accomplished a lot today, but I never stopped all day! Just the planning of the walls and floors is extremely time consuming. This project will definitely not be completed in the five days. Thankfully the organizers and teachers recognize this as well.


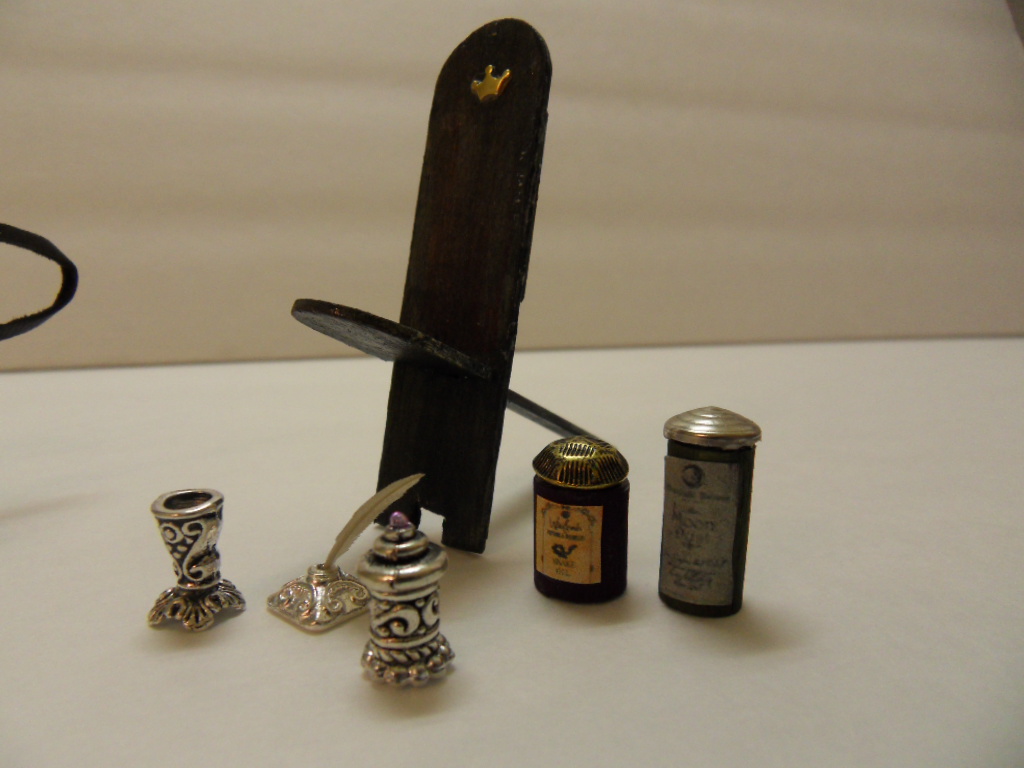
During our lunch break we got another bag of tidbits from the other attendees. Again I received some wonderful items. A beautiful wood candlestick with dripping candles, a leather bound book and feather pen, a Tudor styled water jug in a carrying strap, a beautiful hand turned pottery bowl, “silver” desk accessories, some jar of potions, and a beautiful Tudor chair. The chair came with a note explaining it was Mistress Ann’s Bogchair. The original was built for Mistress Ann by Lord Sylan of Thor’s Mountain – to be potable and set up at different garden events – so that Mistress Anne could use it for the whole event she attended!


During the evening session we exchanged gifties and I received a beautiful Tudor chest.
Until then…..
I decided to move on to carving the stone. At this point I made a big decision. Instead of having a stone floor, which most medieval castles had (if not mud), I decided to have a rough hewn wood floor. I was told that only the upper floors were made from wood, so we will all have to pretend there’s another level under this floor that we can’t see right now.
I drew my pattern unto the foam with a pen first, then scored it with my sharp Olfa knife, and then using a wire brush, I dragged it through the planks to give it the rough hewn effect. I hope you can see the difference in the “planks” before and after I added the grain. I still want to add nailheads, but we are tossing around a few ideas on how to do this effectively. It’s a job for another day.
Then I moved on to carving my first stone wall. Again I laid out a pattern on graph paper first, then drew it on the wall using a ball point pen, and again I made a mistake, but once it’s painted you won’t see the two lines that are drawn in the wrong spots!!
I carved out the stones with the same knife, and it looked too perfectly straight, which wouldn’t be the look of an old castle, so then I proceeded into chipping away bits of the stone to give it a more authentic look. We also textured the walls using a rolled up piece of tin foil. It leaves an extremely authentic look to the “stone.”
I don’t seem to have accomplished a lot today, but I never stopped all day! Just the planning of the walls and floors is extremely time consuming. This project will definitely not be completed in the five days. Thankfully the organizers and teachers recognize this as well.


Tomorrow we have another busy day ahead, but we are hoping to get a little personal time in and visit some of the local areas!
During last evening and today we had several vendors set up selling miniatures. I’ve done some shopping, but I’ll save all my new purchases for another day.
Also in the evening we had a miniature auction to raise money for next year’s Camp. There were many wonderful items donated for the auction. It was a fun evening, but I wasn’t successful in winning anything at the auction. There will be a silent auction tomorrow, so hopefully I will be lucky then!
At lunch I received a wonderful card from all the ladies for my wedding and they gave me a monetary gift which I have to used to buy something miniature to remember all of them! I was hoping to get something in the auction, so cross my fingers for tomorrow’s auction! Thank you to all the wonderful ladies for such a thoughtful gesture! It’s only four weeks away today from my wedding!! Time is getting closer!
Sorry I tried to get the pictures in the right order, but I am struggling here with the internet and it appears moving the pictures around, even in html is next to impossible. Hope you understand the sequence!!
Until then…..
-Wanda


Love watching your progress. The walls and floors are carved out of foam? How wonderful.
ReplyDeleteMe encanta ver el progreso. Esas paredes y suelos son perfectos. Que tipo de material usa?
ReplyDeleteUn saludo, Carmen
I love watching your progress. The windows look like they were suppose to be like that. I like them set in. The floor and bricks look wonderful also. What a beautiful place to have a camp. Can't go wrong when you can be by the water! I was reading your other post and had to laugh at the lobster dinner picture. lol. Have a great time the rest of the time you are there.
ReplyDeletefantastico trabajo
ReplyDeleteEl campamento está siendo muy productivo.
ReplyDeleteLas paredes y el suelos están muy bien. Parece piedra.
Las ventanas están muy bien cortadas.
Seguiré los avances.
Besos Clara
Minis for a wedding pressie lol
ReplyDeleteSo all of the stones and floor are just carved straight into the foam...wow...I can't beleive how impressive this looks.
I plan on making a church and this looks like it might be the way to go. It will be about 6ft long so weight is an issue with wood.
How sturdy is it when it is glued together ?
Hi Tallulah Belle. My walls are not glued together yet, so the only thing I can tell you is what I saw in the prototype. It doesn't travel well once assembled, which the prototype had to be shipped across the county, and one of the crinolations (mispelled, pieces that stick off the top of the castle in the prototype, not on mine yet)was broken off. It would be a very fragile piece even in wood though.
ReplyDeleteWe were told to coat the entire project with something like Mod Podge when it is completed painted and this will bond all the foam, glue and paint together making everything stronger. I do have the stairs glued together and that bond seems fantastic. So I am pleased so far.
Apparently the type of foam is extremely important. The dense insulation type foam in pink is best, blue is okay and white is no good at all (just not as dense, and crumbles when carved). Static electricity is a little problem, so keeping Bounce sheets and Fabricguard spray close does help.
Hope that helps!